

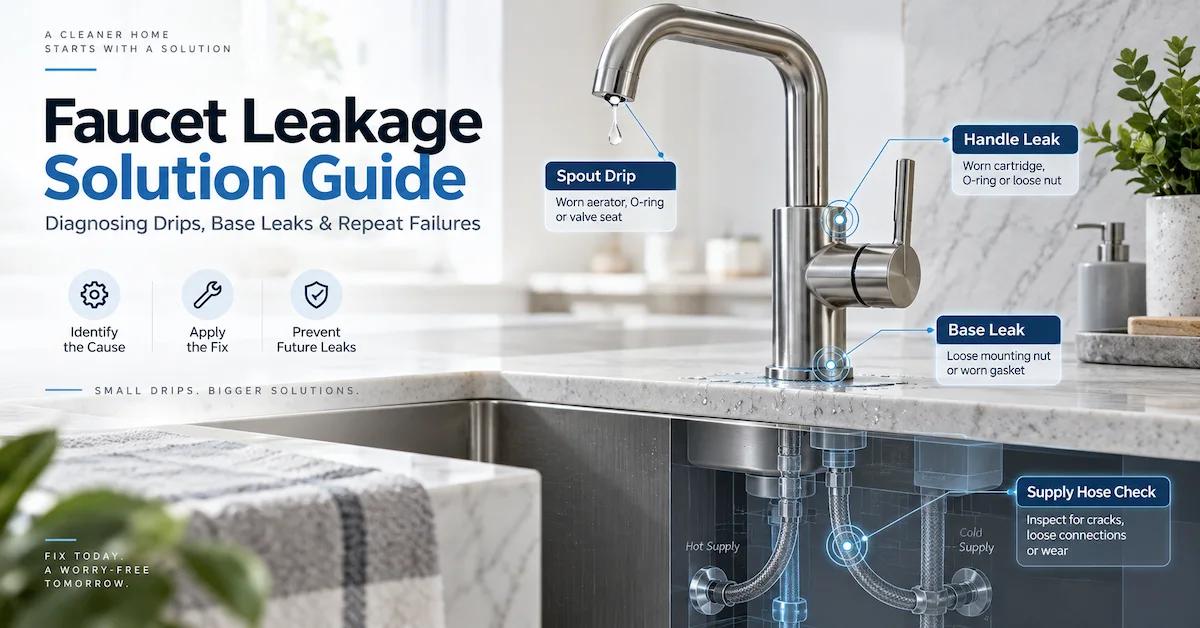
Quick Answer: Find the Leak Location Before Replacing Any Part
This faucet leakage solution guide helps homeowners, maintenance teams, contractors, importers, and project buyers identify where water first escapes, determine whether the cause is a cartridge, seal, hose, connection, installation, or batch-quality issue, and choose the correct corrective action before replacing parts. The fastest way to solve a faucet leak is to identify where the water first appears and under which operating condition it appears.
Do not begin by assuming every drip requires a new cartridge. A faucet can leak from the outlet, handle, rotating spout, body joint, mounting area, flexible hose, quick connector, spray head, inlet connection, concealed valve, or surrounding sink area.
The most useful first distinction is:
- The faucet leaks when turned off: investigate the cartridge, valve seat, sealing surfaces, trapped debris, or pressure-related sealing stress.
- The faucet leaks only while water is running: investigate outlet-path components, spout seals, hoses, spray-head connections, diverters, and body joints.
- The faucet leaks continuously under the sink: investigate supply hoses, inlet connections, crimped hose ends, threads, gaskets, and water migration from above.
- Water appears around the base after use: first rule out splash, condensation, wet hands, and water traveling from the handle or spout.
- Multiple faucets from the same order show the same symptom: stop treating the issue as isolated maintenance and begin a batch-level root-cause investigation.
For a single household faucet, the solution may be a service part.
For a hotel, apartment, retail brand, or distributor, the solution may require component traceability, lot containment, sample comparison, corrective action, and changes to the product specification.
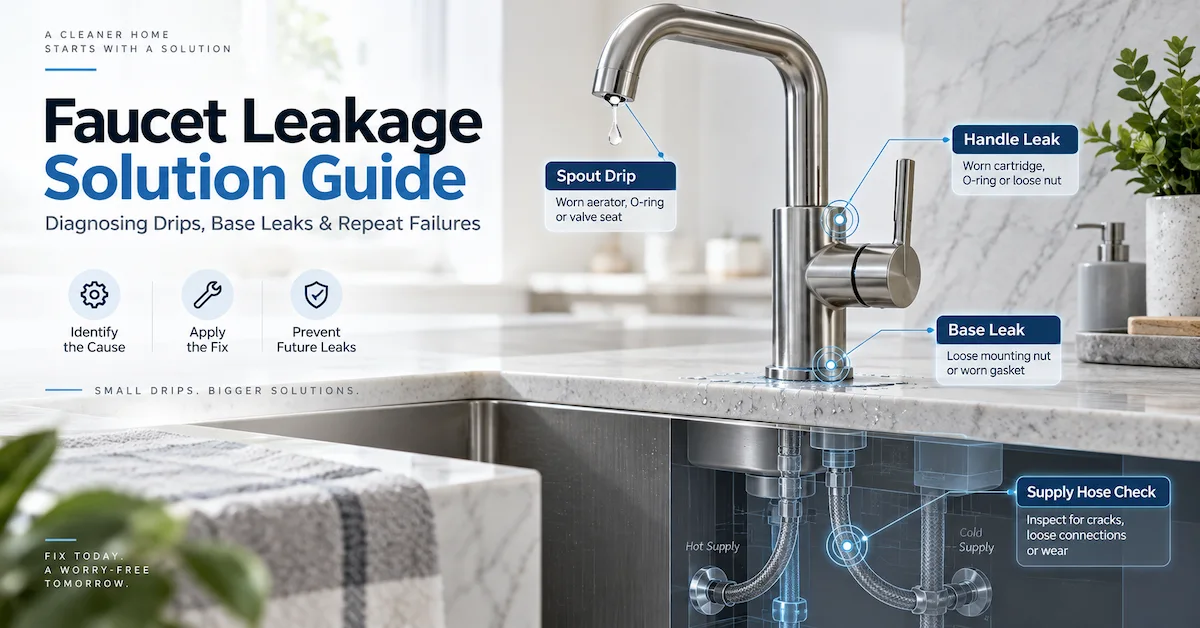
Why Faucet Leakage Is Frequently Misdiagnosed
Water does not always appear directly below the point where the failure begins.
It can travel along:
- a supply hose
- a threaded connection
- the underside of a countertop
- the faucet body
- a mounting stud
- a pull-down hose
- the exterior of a pipe
- the back of a wall plate
A drop visible inside the cabinet may have started around the handle. Water around the faucet base may have come from hand washing rather than an internal seal. Moisture beneath a sink may come from the drain assembly instead of the faucet.
Incorrect diagnosis leads to unnecessary part replacement and repeat service calls.
A cartridge may be replaced even though the real problem is a damaged supply hose. A faucet may be removed even though the leak comes from the drain flange. A connection may be covered with thread tape even though the connection is designed to seal through a flat gasket.
A professional faucet leakage solution guide must therefore begin with observation, isolation, and evidence—not immediate disassembly.
Faucet Leakage Location Map
Use the following table to narrow the likely cause before taking corrective action.
| Where Water Appears | When It Appears | Common Areas to Inspect | Typical Corrective Direction |
|---|---|---|---|
| Faucet outlet or spout | Faucet is closed | Cartridge, valve seat, sealing discs, debris | Clean, inspect, or replace the correct valve component |
| Around the handle | During use or continuously | Stem seal, cartridge O-rings, retaining assembly | Inspect seal condition and cartridge installation |
| Around the faucet base | During use | Spout O-rings, body joint, internal water path, splash | Dry-test and trace the first wet point |
| Under the sink | Static or during use | Supply hoses, inlet connections, quick connectors | Isolate hot/cold supply and inspect each joint |
| Pull-down hose | During spray-head use | Hose body, swivel, quick connector, hose routing | Replace damaged hose or connection component |
| Spray head | During use or after shutoff | Washer, check valve, head connection, diverter | Inspect the specific spray-head assembly |
| Wall behind shower trim | During use or continuously | Cartridge, valve body, outlet connections | Stop water and use qualified service access |
| Commercial pre-rinse assembly | During operation | Spray valve, hose, swivel, riser, add-on spout | Inspect each pressurized joint separately |
| Countertop but no active source | After washing | Splash, condensation, wet hands, drain issue | Confirm whether it is a faucet leak at all |
This table is a starting point. The exact service method depends on the faucet model, valve design, connection type, and installation instructions.
The First Ten Minutes: A Safe Diagnostic Sequence
Before removing a handle or cartridge, complete a controlled inspection.
1. Limit Property Damage
If water is flowing continuously or collecting inside cabinetry, close the appropriate shutoff valves.
For concealed shower valves, inaccessible pipework, damaged supply hoses, or uncontrolled leakage, stop the water supply and involve a qualified plumbing professional.
Do not continue operating a leaking connection simply to collect more evidence if it risks damaging cabinets, flooring, walls, electrical equipment, or adjacent rooms.
2. Dry the Complete Area
Dry the:
- faucet body
- handle
- base
- countertop
- underside of the sink
- hoses
- shutoff valves
- drain connections
- cabinet floor
A dry starting point allows the first new drop to identify the actual leak path.
Absorbent tissue placed around separate connections can help show which area becomes wet first.
3. Test the Faucet in Separate States
Observe the faucet under four conditions:
- both supplies open, faucet off
- cold water running
- hot water running
- mixed water running
For a pull-down or multifunction faucet, also test:
- normal stream
- spray mode
- hose extended
- hose returned
- spout rotated
- diverter activated
A leak that appears only during one operating state provides valuable diagnostic information.
4. Isolate the Hot and Cold Sides
For many faucet designs, closing one supply valve at a time can help identify which inlet, cartridge side, hose, or connection is involved.
For a two-handle faucet, this may help identify whether the hot or cold valve assembly is failing.
Do not force an old or corroded shutoff valve. If the local valve cannot be operated safely, isolate the upstream water supply.
5. Record the Product Identity
Before replacing parts, record:
- brand
- model
- SKU
- finish
- installation date
- order or project
- production batch if available
- cartridge or service-part number
- leak location
- operating condition
- photographs or video
For an individual homeowner, this helps locate the correct service part.
For a distributor or project buyer, it creates the evidence needed to determine whether the complaint is isolated or connected to a specific production lot.
Faucet Drips From the Spout When Turned Off
A drip from the outlet after the faucet has been closed is one of the most common symptoms.
A few residual drops immediately after shutoff can result from water remaining in the spout or aerator. A continuing drip suggests that water is passing through a sealing component that should be closed.
Likely Causes
Depending on the design, possible causes include:
- worn cartridge sealing surfaces
- damaged ceramic discs
- worn washer or valve seat
- debris between sealing surfaces
- damaged cartridge O-rings
- incorrect cartridge installation
- a loose retaining assembly
- internal scratching caused by contamination
- component distortion
- an incompatible replacement cartridge
In two-handle faucets, the hot and cold sides should be checked separately.
In a single-handle mixer, the complete cartridge and the surfaces supporting it may require inspection.
Why Replacing the Cartridge Does Not Always Solve the Drip
A new cartridge can still leak if:
- debris remains inside the body
- the cartridge model is incorrect
- the body sealing surface is damaged
- an O-ring is twisted or cut
- the cartridge is installed in the wrong orientation
- retaining pressure is uneven
- the body cavity is outside dimensional tolerance
- inlet contamination immediately damages the new component
This is especially important for B2B claims.
If multiple new cartridges fail in the same faucet body, replacing cartridges repeatedly is not a complete corrective action. The supplier should investigate the body, machining, assembly method, water cleanliness, component compatibility, and cartridge-lot traceability.
B2B Prevention
Brands and project buyers should define:
- cartridge manufacturer and model
- approved substitute policy
- seal materials
- dimensional interface
- assembly method
- functional test
- post-endurance leakage criteria
- replacement-part identification
AQBATH’s existing bathroom faucet manufacturer quality audit explains why “ceramic cartridge” alone is not a complete procurement specification.
Faucet Leaks Around the Handle
Water around the handle often appears while the faucet is open, but it may also appear under static pressure.
Potential Causes
Investigate:
- stem O-ring or seal
- cartridge body seal
- retaining nut or bonnet condition
- cracked cartridge housing
- damaged handle interface
- incorrect cartridge seating
- seal contamination
- body-cavity damage
A leak around the handle can travel downward through the faucet body and later appear at the base or beneath the sink.
That is why replacing a base gasket may not solve what appears to be a base leak.
Diagnostic Clue
After drying the faucet, wrap a narrow piece of tissue around the handle-to-body junction.
Operate the faucet without allowing water to splash onto the tissue. If the tissue becomes wet before water reaches the faucet base, the leak is likely beginning around the handle assembly.
Supplier-Level Root Causes
In a new production batch, repeated handle-area leakage may indicate:
- incorrect O-ring size
- O-ring damage during assembly
- insufficient or incompatible seal lubrication
- sharp edges cutting the seal
- cartridge tolerance variation
- incorrect assembly force
- mixed cartridge models on the line
- dimensional variation in the machined cartridge cavity
A useful corrective-action report should identify why the existing inspection process failed to detect the condition—not simply state that the operator was retrained.
Water Appears Around the Faucet Base
Water around the base is frequently misunderstood because the visible location may not be the original source.
Possible Sources
Water may come from:
- splash from the basin
- wet hands operating the handle
- water running down the spout
- a handle-area leak
- rotating-spout O-rings
- an internal body joint
- a failed seal above the deck
- a cracked body
- condensation
- water migrating through the mounting hole
Base Seal vs Internal Water Seal
The gasket between the faucet base and countertop is not always designed to contain pressurized water from inside the faucet.
Its main function may be to:
- stabilize the faucet
- protect the countertop
- reduce surface water entering the mounting hole
- improve appearance
If pressurized water is leaking internally, replacing or sealing the countertop gasket may hide the route temporarily without correcting the actual defect.
Rotating Spout Leakage
Faucets with rotating spouts often use one or more O-rings between the spout and body.
Leakage can occur if the seals are:
- worn
- cut
- twisted
- dry
- contaminated
- incorrectly sized
- installed against a damaged surface
Movement can make the leak intermittent. Test the faucet with the spout in multiple positions.
Mounting Stability and Leakage
A loose faucet is not automatically leaking, but continued movement can place additional stress on:
- hoses
- seals
- body joints
- supply connections
- mounting hardware
The mounting structure should therefore be checked as part of the diagnosis.
AQBATH’s top-fixed faucet range is designed around above-deck mounting access, which can simplify certain installation and maintenance operations. However, top-fixed mounting does not eliminate the need for correct seals, hoses, cartridge control, and leakage testing.
Faucet Leaks Under the Sink
Under-sink leakage deserves urgent attention because it may remain unnoticed until cabinetry or flooring is damaged.
Common Sources
Inspect:
- hot supply hose
- cold supply hose
- hose-to-faucet connection
- hose-to-shutoff-valve connection
- hose crimp
- quick connector
- pull-down hose
- mounting hole
- faucet body above the deck
- shutoff valve
- drain assembly
Do not assume moisture below the sink originates from the faucet.
Static Leak vs Dynamic Leak
A static leak appears while the faucet is off because the supply-side component remains pressurized.
A dynamic leak appears only while water flows through a particular path.
This distinction helps separate supply-side defects from outlet-side defects.
For example:
- a leaking inlet hose may drip continuously
- a damaged pull-down hose may leak only when the faucet is running
- a spray-head connection may leak only in spray mode
- water from the handle may travel down the body and appear under the sink
Connection Type Matters
Not every connection seals through its threads.
Connections may use:
- a flat gasket
- O-ring
- compression ferrule
- cone seal
- threaded sealant
- factory-crimped joint
- quick-connect seal
Applying thread tape to a gasketed or compression connection may fail to correct the leak and can interfere with proper assembly.
Use sealing material only when the connection design and product instructions require it.
Over-Tightening Can Also Create Leaks
A loose connection can leak, but more force is not always the correct solution.
Over-tightening can:
- distort a gasket
- cut an O-ring
- crack a plastic component
- damage threads
- twist a hose
- deform a sealing face
- damage the finish
The correct method depends on the connection type, component material, and manufacturer instructions.
Pull-Down and Pull-Out Faucet Leakage
Pull-down and pull-out kitchen faucets introduce moving components that are not present in a fixed spout.
Buyers reviewing the AQBATH kitchen faucet range should treat the hose, spray head, swivel, weight, and connector as part of the complete reliability system—not as minor accessories.
Common Pull-Down Leak Locations
- spray-head connection
- hose body
- hose crimp
- quick connector
- swivel
- diverter
- check valve
- internal spout connection
Hose Abrasion
A hose can rub against:
- cabinet edges
- rough mounting hardware
- stored products
- drain components
- shutoff valves
- an incorrectly positioned counterweight
A hose may pass initial testing but fail later if the installation route creates repeated abrasion.
Twisting and Kinking
The hose should move freely without twisting around supply lines or becoming trapped.
A kink can affect flow and place stress on connections. An incorrectly installed weight can also pull the hose in an unintended direction.
Spray-Head Leakage
If water appears where the hose connects to the spray head, inspect the washer or seal and confirm that the connection is correctly seated.
If water continues from the spray head after shutoff, determine whether it is only residual drainage or a continuing cartridge leak.
B2B Control Points
For OEM and private-label programs, buyers should specify:
- hose supplier and part number
- hose length
- approved crimp structure
- quick-connector design
- pull-out or movement test
- burst or pressure evidence where applicable
- hose-routing instructions
- spare-part availability
A visually identical replacement hose may not have the same connector, seal, pressure capability, or routing behavior.
Shower and Bathtub Faucet Leakage
Shower and bathtub leaks require a different diagnostic approach because some water paths are concealed.
Buyers can review AQBATH’s current shower faucet collection, but troubleshooting must always be based on the exact valve and installation.
Dripping Showerhead After Shutoff
Some water may continue to drain from the showerhead immediately after use, especially in larger overhead systems.
A continuing drip may indicate that the control cartridge or valve is not sealing completely.
Water Around the Handle or Trim Plate
Possible causes include:
- cartridge or stem seal leakage
- water entering from the shower surface
- failed trim seal
- leakage from a concealed connection
- water traveling from a higher point
Diverter Problems
A bathtub-and-shower system may leak or cross-flow if a diverter is worn, obstructed, incorrectly assembled, or incompatible with the valve configuration.
Concealed Leakage
If water is suspected behind the wall:
- stop operating the fitting
- isolate water if necessary
- avoid covering or sealing the symptom without locating the source
- use qualified professional inspection
A concealed leak can cause substantially more damage than a visible drip.
For project buyers, access panels, valve serviceability, spare cartridges, diverters, and clear installation drawings should be considered before bulk approval.
Commercial Pre-Rinse Faucet Leakage
Commercial pre-rinse faucets operate in demanding environments and include more joints than a basic basin faucet.
AQBATH’s commercial kitchen faucet series includes pre-rinse configurations for restaurant, hotel, catering, and professional kitchen applications. Ningbo Yinzhou AG Valve Co., Ltd.
High-Risk Leak Points
Inspect:
- spray valve
- hose
- hose-to-spray-valve connection
- overhead spring area
- swivel
- riser
- add-on faucet
- swing spout
- wall- or deck-mount connections
- supply inlets
- check valves
Why Commercial Leaks Become Operational Problems
A small residential drip may be inconvenient.
In a commercial kitchen, the same issue may cause:
- wet floors
- interrupted cleaning
- hygiene concerns
- staff workarounds
- equipment downtime
- repeated service visits
- damage to surrounding work areas
Commercial Root-Cause Questions
When a commercial pre-rinse faucet leaks, ask:
- Is the failure at a serviceable wear component?
- Is the hose being pulled beyond its intended range?
- Is the wall bracket correctly supporting the riser?
- Is the spray valve exposed to impact?
- Is the water pressure within the intended operating range?
- Are cleaning chemicals affecting seals?
- Is the same failure appearing across multiple units?
- Are genuine replacement parts available?
A durable commercial faucet program requires a defined spare-parts strategy, not only a strong-looking sample.
How to Decide Whether to Repair or Replace the Faucet
The lowest-cost immediate action is not always the lowest-cost long-term decision.
| Condition | Repair May Be Appropriate | Replacement May Be More Appropriate |
|---|---|---|
| Known cartridge failure | Correct part is available and body is undamaged | Repeated cartridge failures or damaged cavity |
| Worn spout O-ring | Sealing surface is intact | Corroded, cracked, or heavily damaged body |
| Loose connection | Connection and threads are undamaged | Cross-threaded or cracked connection |
| Damaged flexible hose | Exact replacement hose is available | Obsolete connector or multiple aged components |
| Finish-only issue | No structural or water-path damage | Corrosion has reached sealing or structural areas |
| Isolated field failure | No similar batch complaints | Repeated lot-level failure |
| Old faucet | Parts remain available and service is practical | Parts unavailable or repair labor is uneconomical |
| Concealed valve problem | Service part can be accessed safely | Body or concealed connection is damaged |
Repair Is Usually Rational When
- the root cause is clear
- the faucet body is sound
- the correct replacement part is available
- the repair does not compromise certification or safety
- service access is reasonable
- the failure is isolated
- the repaired product can be functionally verified
Replacement Is Often Rational When
- the faucet body is cracked
- threads or sealing surfaces are damaged
- repeated failures occur
- the correct part cannot be identified
- the product has been modified unpredictably
- corrosion affects structural or water-contact areas
- repair labor exceeds replacement value
- concealed damage cannot be controlled
- a batch-quality issue requires standardized replacement
For project owners, replacement decisions should also consider compatibility with existing holes, countertops, hoses, finishes, and spare-parts inventories.
Why a Newly Installed Faucet Can Leak
A new faucet leak does not automatically prove that the product was manufactured incorrectly.
It also does not automatically prove that the installer caused the issue.
The correct approach is to examine both.
Installation-Related Causes
- cross-threaded connection
- missing gasket
- misplaced O-ring
- twisted hose
- over-tightening
- under-tightening
- incorrect sealant use
- debris entering the cartridge
- hose abrasion
- unsupported piping
- incorrect mounting thickness
- poor access causing incomplete assembly
Product-Related Causes
- damaged seal
- wrong component
- machining defect
- casting porosity
- damaged sealing surface
- incorrect cartridge
- cracked connector
- defective hose
- assembly variation
- missed leakage test
Specification-Related Causes
Sometimes neither the installer nor the production operator is the primary root cause.
The specification itself may be incomplete.
Examples include:
- connection standard not defined
- countertop thickness not provided
- target pressure not stated
- hose length not matched to the installation
- substitute components permitted without approval
- service clearance not considered
- unsuitable faucet selected for the application
The strongest corrective action addresses product, process, installation, and specification together.
Why Faucet Leaks Return After a Repair
A repeated leak usually means the repair addressed the failed part but not the condition that caused it to fail.
Common Reasons
- debris remains in the system
- high or unstable pressure continues
- the wrong replacement component is used
- the sealing surface is damaged
- an O-ring is installed dry or twisted
- the hose continues rubbing against an edge
- the faucet remains loose
- the body is cracked
- cleaning chemicals attack the seal
- the substitute cartridge is dimensionally different
- the repair method does not match the connection design
Corrective vs Preventive Action
A correction stops the current leak.
A corrective action removes the verified cause of that leak.
A preventive action reduces the probability that the same mechanism will affect other products or future production.
For example:
- replacing one damaged O-ring is a correction
- removing a sharp machining burr is corrective action
- updating the machining control and seal inspection plan is preventive action
This distinction is essential for brands and importers managing warranty claims.
Classifying Faucet Leakage Root Causes
A structured investigation should place the failure into one or more root-cause categories.
1. Design
Examples:
- inadequate seal support
- unsuitable O-ring groove
- excessive hose movement
- insufficient body wall
- difficult service access
- stress concentrated at a connection
- water path that traps debris
2. Material
Examples:
- unsuitable elastomer
- inconsistent brass or polymer
- hose material aging
- brittle connector
- incompatible lubricant
- chemical exposure beyond the material capability
3. Machining
Examples:
- damaged sealing face
- burr
- thread error
- incorrect diameter
- poor concentricity
- cavity depth variation
- porosity exposed by machining
4. Component
Examples:
- cartridge variation
- incorrect O-ring
- hose crimp defect
- gasket dimensional error
- quick-connector defect
- supplier substitution
5.Assembly
Examples:
- missing seal
- twisted O-ring
- incorrect torque
- wrong component
- incomplete connection
- contaminated sealing surface
- cartridge misalignment
6. Installation
Examples:
- cross-threading
- twisted hose
- wrong sealant
- over-tightening
- insufficient support
- incorrect hole or deck thickness
- incompatible connection
7. Operating Environment
Examples:
- pressure variation
- water hammer
- mineral deposits
- abrasive particles
- thermal cycling
- aggressive cleaning chemicals
- unusually high usage
- impact or misuse
8. Quality-System Failure
Examples:
- test not performed
- test method did not reproduce the failure
- test station not calibrated
- failed unit was not contained
- traceability was incomplete
- unauthorized component change
- complaint data was not analyzed
A credible supplier investigation should identify both the physical cause and the system cause.
How B2B Buyers Should Handle a Batch Leakage Complaint
When several products may be affected, do not begin with unstructured replacements.
Use a controlled complaint process.
Step 1: Define the Problem Precisely
Record:
- affected model
- finish
- batch or shipment
- installation date
- number installed
- number inspected
- number leaking
- exact leak location
- static or dynamic condition
- pressure and application
- photographs and videos
- installer observations
“Faucet leaking” is not a sufficiently precise problem description.
Step 2: Contain the Risk
Containment may include:
- stopping installation of suspect stock
- separating unopened inventory
- inspecting installed units
- providing temporary service parts
- protecting property
- identifying affected lots
- increasing outgoing inspection
Containment protects the customer while the root cause is investigated.
Step 3: Retain Failed Parts
Do not discard cartridges, O-rings, hoses, or connectors before the supplier has an opportunity to analyze them.
Label every returned part with its product, location, batch, and symptom.
A mixed box of unidentified service parts has limited investigative value.
Step 4: Compare Failed and Good Samples
A useful comparison may examine:
- dimensions
- material
- seal condition
- cartridge model
- machining marks
- assembly orientation
- hose lot
- connection damage
- pressure-test result
The goal is to identify a difference that explains the observed symptom.
Step 5: Verify Root Cause
A possible cause is not a verified cause.
The supplier should reproduce the failure mechanism or provide evidence showing why the identified condition produces the leak.
Step 6: Validate Corrective Action
Corrective action should be tested under conditions relevant to the failure.
Replacing a component with another component is not sufficient evidence unless the revised configuration eliminates the problem without creating a new one.
Step 7: Prevent Recurrence
Update the necessary:
- drawing
- BOM
- component specification
- work instruction
- fixture
- inspection method
- leakage test
- training
- supplier control
- packaging or installation guide
The change should also be linked to future production and spare parts.
Leakage Testing: What Buyers Should Ask a Faucet Supplier
AQBATH’s company profile lists product leakage testing together with material analysis, coating testing, dimensional measurement, hardness testing, lifespan testing, and salt-spray testing. The company also lists design, mold, casting, forging, machining, polishing, electroplating, and related manufacturing capabilities. Ningbo Yinzhou AG Valve Co., Ltd.
However, a test name is not the same as a complete test requirement.
Ask the supplier to define:
- exact model
- test stage
- test pressure
- test duration
- water temperature
- faucet operating position
- static or dynamic condition
- acceptance criteria
- sample quantity
- whether testing is 100% or sampled
- equipment identification
- calibration status
- traceability record
- response to a failed test
Static Pressure Testing
Static testing evaluates whether pressurized components remain sealed when water is not flowing.
It can help detect failures in:
- supply-side seals
- body joints
- hoses
- connectors
- cartridge containment
- closed-valve sealing
Dynamic Testing
Dynamic testing evaluates the faucet during operation.
It may reveal:
- spout-joint leaks
- hose leaks
- diverter problems
- spray-head leakage
- leaks that occur only during movement
- instability at varying flow conditions
Functional Leakage Testing
Testing should consider the functions present in the actual configuration.
For a multifunction kitchen faucet, the test may need to cover:
- stream mode
- spray mode
- hose extension
- spout rotation
- diverter operation
- shutoff behavior
For a shower system, the relevant matrix may include:
- mixer
- diverter
- hand shower
- overhead shower
- hose
- outlet connections
Post-Endurance Leakage
A faucet may pass an initial leak test and develop leakage after repeated operation.
Where relevant, buyers should review post-endurance performance—not only the pre-test condition.
Test Station Detection Capability
A test process should be capable of detecting the type and size of defect that matters to the customer.
Questions include:
- Can the station detect a slow leak?
- Are hidden surfaces observable?
- Is the test long enough for the defect to appear?
- Is the unit manipulated during the test?
- Does the test cover the complete assembled faucet?
- Is the result linked to a production lot?
Factory Controls That Reduce Faucet Leakage Risk
Leak prevention begins before final testing.
Incoming Component Control
Critical components may include:
- cartridge
- O-rings
- gaskets
- flexible hoses
- quick connectors
- aerators
- check valves
- diverters
- mounting hardware
The supplier should control the approved manufacturer, part number, material, dimensions, and change process.
Body and Waterway Control
Casting, forging, and machining can affect leakage through:
- porosity
- wall thickness
- thread quality
- sealing-face condition
- dimensional alignment
- internal cleanliness
A polished surface cannot compensate for an internally damaged water path.
Seal Handling
Seal control should address:
- correct part selection
- storage
- cleanliness
- lubrication where required
- protection from sharp edges
- orientation
- assembly verification
Torque and Assembly Control
Under-tightening may leave a connection loose.
Over-tightening may damage the same connection.
The production method should provide repeatable assembly rather than depending entirely on operator judgment.
Cleanliness
Metal chips, polishing compound, dust, and other contaminants can damage cartridges or prevent seals from closing.
Cleaning and flushing controls are therefore part of leakage prevention.
Final Functional Test
The completed product should be tested in the configuration that will be shipped.
A component certificate does not prove that the final assembled faucet is leak-free.
Traceability
The supplier should be able to connect a finished unit to relevant:
- component lots
- body batch
- machining date
- assembly line
- test station
- inspection record
AQBATH’s manufacturer audit guide provides a broader evidence checklist covering components, sealing surfaces, assembly control, pressure testing, traceability, and corrective action. Ningbo Yinzhou AG Valve Co., Ltd.
What to Put in an RFQ to Reduce Leakage Claims
A strong quotation request should not say only:
Please quote a good-quality faucet that does not leak.
Instead, define the product and evidence expected.
Product Definition
Include:
- faucet category
- model or reference
- application
- destination market
- installation type
- body and waterway requirements
- finish
- annual volume
- initial order quantity
Connection and Installation
Define:
- mounting-hole requirement
- countertop or deck thickness
- connection type
- thread standard
- hose length
- access constraints
- supply conditions
- required accessories
Critical Components
Identify:
- cartridge expectation
- seal requirements
- flexible hoses
- aerator
- diverter
- spray head
- quick connectors
- approved substitutions
Leakage and Function Testing
Request:
- test plan
- model-specific conditions
- acceptance criteria
- sampling or 100% inspection status
- test record format
- failed-unit handling
- post-endurance verification where appropriate
Change Control
Require written approval before changing:
- cartridge
- hose
- O-ring
- gasket
- connector
- material
- machining process
- assembly method
- testing method
- factory location
AQBATH’s OEM faucet manufacturing guide explains how a controlled BOM, approved sample, test requirements, packaging, and repeat-order change control help turn a customized faucet into a repeatable product.
Application-Specific Leakage Prevention
The same faucet configuration should not automatically be used in every environment.
Hotels and Serviced Apartments
Hotel buyers should prioritize:
- consistent cartridges
- accessible service parts
- standardized hoses and connectors
- mock-up installation
- room-level batch records
- spare cartridges and aerators
- cleaning-chemical guidance
- phased-order consistency
A small leakage rate can create repeated room closures, cabinet damage, and labor costs across a large property.
The project-standard bathroom faucet guide explains why consistency across multiple production batches matters as much as the performance of one approved sample.
Apartment and Multifamily Projects
Key controls include:
- installation simplicity
- mounting compatibility
- standard connections
- installer training
- repeatable parts
- accessible shutoff valves
- early inspection of the first completed units
Installation feedback from the first apartments should be reviewed before the full project proceeds.
Private-Label and Retail Brands
For retail brands, leakage prevention affects:
- product reviews
- returns
- warranty cost
- replacement inventory
- brand reputation
- customer-support workload
Service diagrams, part numbers, and clear troubleshooting instructions should be prepared before launch.
Commercial Kitchens
Commercial kitchen programs should focus on:
- hose and swivel durability
- spray-valve serviceability
- replacement parts
- mounting support
- cleaning exposure
- continuous-use conditions
- downtime planning
Healthcare and Public Facilities
These environments may require:
- high-use durability
- predictable maintenance
- accessible service
- controlled replacement parts
- appropriate materials
- compatibility with cleaning protocols
A product that performs well in a private bathroom may require a different specification for a high-traffic facility.
Total Cost of a Faucet Leak
The visible replacement part may be the smallest part of the actual cost.
A faucet leak can create:
- installer callout cost
- maintenance labor
- replacement freight
- cabinet damage
- flooring damage
- room downtime
- restaurant disruption
- warranty administration
- returned inventory
- customer complaints
- negative product reviews
- emergency spare-part purchases
- sorting and reinspection
- brand damage
For a B2B buyer, lifecycle cost should therefore include:
unit price + installation + expected service + spare parts + claim handling + property risk + supply continuity.
The cheapest faucet is not the lowest-cost faucet when a small component failure creates repeated field work.
How AQBATH Can Support Leakage-Risk Evaluation
AQBATH currently publishes product categories covering basin, kitchen, shower, bathtub, commercial kitchen, brass-series, and top-fixed faucets. Buyers can review the complete faucet catalog, then identify the closest model or product platform for technical evaluation. Ningbo Yinzhou AG Valve Co., Ltd.
The company website also lists capabilities in:
- product and mold design
- brass and lead-free brass casting
- zinc-alloy die casting
- forging
- welding
- pipe bending
- precision machining
- polishing
- electroplating
- material analysis
- dimensional measurement
- lifespan testing
- product leakage testing
- coating and salt-spray testing
These company-level capabilities are a useful starting point, but buyers should still request model-specific information for the exact faucet, component configuration, destination market, and order.
A productive leakage-prevention inquiry should include:
- product category or model
- target market
- application
- quantity
- installation drawing
- pressure and connection conditions
- cartridge or component requirements
- current leakage complaint, if any
- photographs and failed parts
- required test evidence
- expected spare-parts support
FAQ
1. Why does a faucet continue dripping after it is turned off?
A continuing drip usually indicates that the internal valve or cartridge is not fully sealing. Possible causes include wear, debris, damaged sealing surfaces, incorrect installation, or an incompatible cartridge. A few residual drops immediately after shutoff may simply be water draining from the spout, so observe whether the dripping stops or continues.
2. Can high water pressure cause a faucet to leak?
Excessive or unstable pressure can place additional stress on cartridges, hoses, seals, and connections. However, pressure should not be blamed automatically. The product, installation, component condition, and actual supply pressure should all be checked. A pressure issue may expose a marginal seal, but replacing the seal without addressing the operating condition can result in recurrence.
3. Why is water collecting around the faucet base?
The source may be splash, wet hands, a handle leak, rotating-spout O-rings, an internal body joint, or water migrating through the mounting hole. Dry the entire faucet and countertop, then operate the faucet without splashing to identify the first area that becomes wet.
4. How do I know whether the leak comes from the faucet or the drain?
Dry both systems completely. Observe the faucet with the basin drain unused, then test the drain separately by filling and releasing water. Moisture around the drain trap, drain body, or basin outlet may be unrelated to the faucet. Under-sink water can travel along pipes, so identify the first wet point rather than the lowest drop.
5. Should thread tape be used on every leaking faucet connection?
No. Some connections seal through a gasket, O-ring, compression ferrule, cone, or factory connector rather than the threads. Adding tape to the wrong connection may not solve the leak and can interfere with proper assembly. Follow the connection design and model-specific installation instructions.
6. When should a faucet cartridge be replaced?
Replacement may be appropriate when a confirmed cartridge defect causes outlet dripping, poor shutoff, or handle-area leakage and the faucet body remains undamaged. Before replacement, verify the exact cartridge model, inspect the cavity and seals, remove contamination, and confirm that the body’s sealing surfaces are intact.
7. Why does a new replacement cartridge still leak?
Possible reasons include the wrong cartridge, debris, damaged O-rings, incorrect orientation, an uneven retaining assembly, damaged body surfaces, machining variation, or contamination entering the new cartridge. Repeated replacement without root-cause confirmation can waste parts and delay the permanent solution.
8. Is a top-fixed faucet less likely to leak?
Top-fixed mounting can improve access to the mounting structure and simplify certain installation operations, but it does not automatically prevent internal leakage. Cartridge quality, seal design, hose control, machining, assembly, and pressure testing remain critical.
9.What should a buyer request after multiple faucets leak?
Request immediate containment, affected-lot traceability, failed-part analysis, good-versus-failed comparison, verified root cause, permanent corrective action, validation evidence, and confirmation that future production and spare parts have been updated. The response should identify both the physical failure and why the quality system did not prevent or detect it.
10. Does 100% leakage testing guarantee that no faucet will ever leak?
No. Final testing can reduce outgoing defects, but it cannot by itself eliminate failures caused by long-term wear, installation damage, component aging, water conditions, unauthorized substitutions, or operating conditions outside the product specification. Reliability requires design, material, machining, assembly, testing, installation, and maintenance controls.
11. What is the most important leakage information to put in an OEM faucet specification?
Specify the exact model, cartridge, hoses, seals, connectors, installation conditions, test method, operating conditions, acceptance criteria, inspection frequency, traceability, spare parts, and change-control requirements. The specification should also identify what happens when a unit fails testing or a component supplier changes.
12. How can I request a leakage-risk review from AQBATH?
Provide the faucet type or model, destination market, application, quantity, installation details, connection requirements, operating conditions, and any existing leak evidence. You can submit these details through the AQBATH contact page so the team can evaluate the relevant product platform, component configuration, testing scope, and next steps.
Conclusion
A reliable faucet leakage solution guide begins by locating the first wet point and separating static, dynamic, installation, component, and batch-level failures. Replacing a cartridge, hose, or seal may stop one leak, but brands and project buyers also need controlled specifications, traceability, model-specific testing, spare parts, and verified corrective action to prevent recurrence.
To review suitable faucet platforms, explore the AQBATH product range. For a current leakage complaint, OEM quality review, hotel project, or bulk procurement program, send AQBATH your model, application, quantity, installation conditions, and failure evidence for technical evaluation.